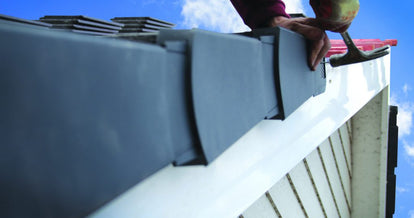
Dry Verge Installation
Posted on 05 July, 2021
Following changes to the British Standard code of practice for slating and tiling, perimeter roof tiles are now required to be double-fixed. Dry verge is a great solution that not only complies with BS 5534, it also provides a mortar-free verge and secondary mechanical fixing for perimeter tiles.
Dry verge systems are easy to fit and as they are ambidextrous, they can be adapted on site to fit either the left or right-hand verges of the roof. This means that only one verge is required, rather than two.
Dry verge is typically supplied in packs of 10 that contain everything you need for a secure fitting including batten end clips and stainless steel nails, in this blog – we’re going to take you through a step by step dry verge installation.
What You Need:
- Underlay
- Tiling Battens
- Batten End Clips
- Eaves Closure Unit
- Ridge End Cap
Step One – Setting Out the Dry Verge
Following the manufacturer’s instructions, install the underlay. Extend the tiling battens 45mm beyond the bargeboard, brickwork or gable ladder – ensuring all battens project by the same distance to ensure a straight verge line.
Step Two – Fix the Batten End Clips
Install the batten end clips using the nails provided. The batten end clip should be fixed to the end of each tile batten to create a secure fixing for the verge units.
Step Three – Fit the Eaves Closure
The eaves closure unit should be fitted over the first tile in the eaves course. This closure unit prevents birds and water from getting in the roof and provides the fixing position for the eaves clip. Once fitted, fix the bargeboard through the appropriate holes in the eaves closure unit using the screws provided. It is possible to fix the eaves closure to the fascia using the ‘L’ clip provided.
Step Four – Prepare the Rapid Verge Units
Snap the relevant tab as marked depending on whether you need the right or left side of the roof. Clip the first unit over the eaves closure unit and slide in the direction of the ridge until the tail lines up with the tail of the roof tile. Secure by nailing the head of the rapid verge unit into the batten end clip attached to the first tiling batten, nail through the most convenient hole using the fixings provided.
Step Five – Laying the Dry Verge
Position the second rapid verge unit in the upper and lower slots of the first unit. Slide in until you’re sure that the upper and lower legs are properly engaged in the direction of the ridge until the tail lines up with the roof tile. Secure the head of the second rapid verge unit to the batten end clip as in the step above and continue in this manner until the length of the verge is up to the ridge.
Step Six – The Top Course
Attach a ridge comb to the top of the ultimate rapid verge unit, this comb prevents birds and insects entering the roof. Side the ultimate rapid verge unit back in the direction of the ride until the tail of the unit meets the tail of the roof tile.
Step Seven – Finishing Off
Repeat these steps to create the verge on the other side of the ridge and make sure the ridge combs attach to the ultimate verge units. Take care to ensure this is done correctly and that they interlock properly at the apex. Finish the ridge with either a ridge end cap or a block end ridge.
Fitting dry verge to old roof
If you are fitting your dry verge to an existing building, you need to remove all of the old underclock and motor bedding before fixing. A timber batten can then be installed running from the eave to the ridge to provide a base for the units to fix into.
Got questions on dry verge installation? Speak to one of our team, or take a look at our full dry roofing range for everything you need to install a dry verge system. For more help and advice, check out our roofing guides for info on building and repairing your roof or read some of our other blogs below.